Last Updated: July 18, References. To create this article, 19 people, some anonymous, worked to edit and improve it over time. This article has been viewedtimes.
Learn more Fiberglass is used to build boats for many reasons. Chief among these are its durability, but also its easy to consfruction. You can patch boat holes in an afternoon and fiberglass a boat in just a couple of days. This article covers how to fiberglass a boat using epoxy resin. Whether you need to level up technical and professional skills for work, increase your financial literacy, or even improve your personal relationships, we have courses for you.
Log in Social login does not work in incognito and private browsers. Please log in with your username or email one off fiberglass boat construction note continue. No account yet? Create an account. Edit this One off fiberglass boat construction note. We use cookies to make wikiHow great. By using our site, you agree to one off fiberglass boat construction note cookie policy.
Cookie Settings. Learn why people trust wikiHow. Download Article Explore this Article Steps. Tips and Warnings. Things You'll Need. Related Articles. Prepare the boat for fiber-glassing.
Before you begin the process of applying fiberglass to your boat, you need to prepare the boat. There are several preparations to consider. Removing extra items from the bottom of the boat. You should remove the keel, any lift stakes or rails, and anything else that should not be covered in fiberglass.
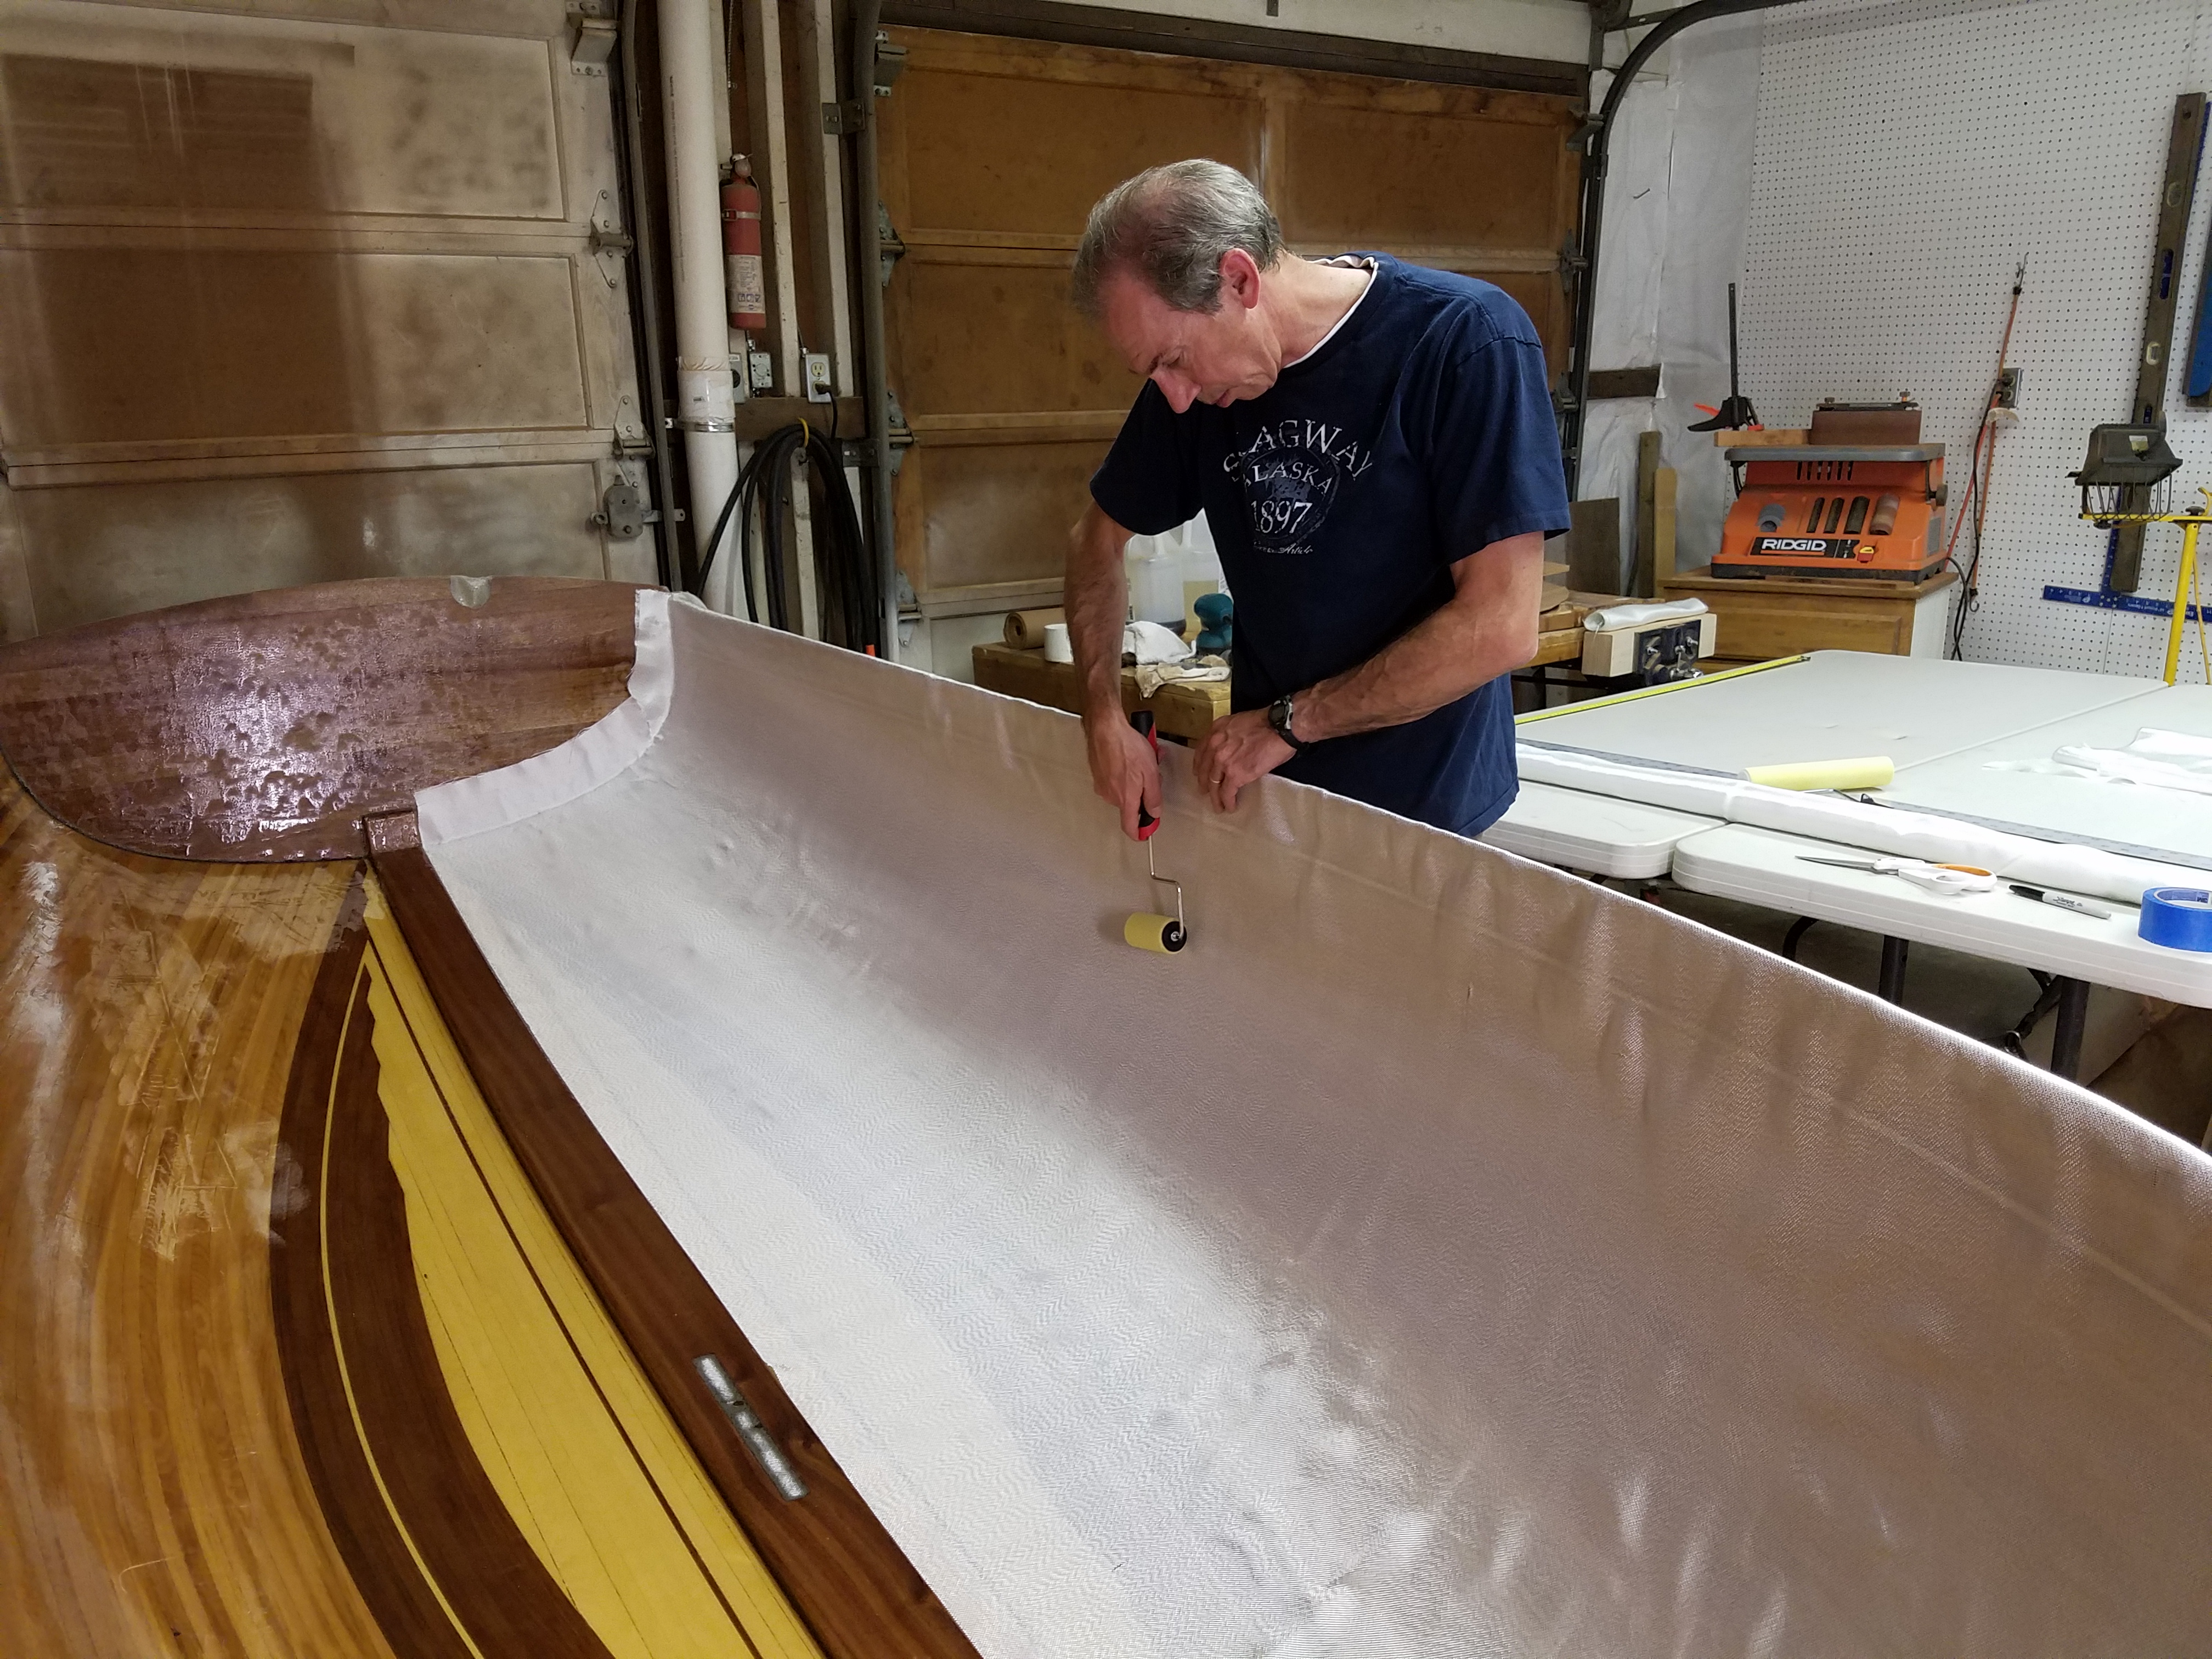
Mix resin and hardener according to package directions and pour the solution into a paint tray immediately. After about 30 minutes, the solution should be significantly hardened and ready to apply to the hull of the boat. Apply the first coat of resin. This first coat is called fiberflass seal coat. Using a foam roller, apply firm pressure and directional strokes to spread the resin as evenly as possible.
Wait for the surface to no longer be tacky before doing additional work on the hull. Prepare and install the fiberglass cloth. Cut fiberglass cloth to the shape needed. Apply a second coat of resin. This coat is called the bond coat. If you have waited for a while, consider sanding the hull.
Working from one end of the hull to the other, apply the bond coat over the fiberglass cloth. Remove the material you have used to attach the fiberglass cloth to the boat before the bond coat sets up completely.
Apply another coat of resin. This coat is known as the fill coat. Wait for the previous coat to set up hard. If you have waited a significant period of time, clean bost sand the hull. Apply a final coat of resin. The finish coat should be smooth and even, but should also be thick enough to allow you to sand the hull evenly without one off fiberglass boat construction note the cloth.
Sand the hull. Give the final coat enough time to dry, preferably overnight. Use lower grit paper at first and finish with a higher grit paper. Apply a protective agent. This can be paint or another boat hull finish. Apply the protective agent according to the package directions. I have accidentally drilled a 3mm hole where the boat goes on the skidbar; how can I fiberglas it?
Clean the hole, rough up around hole, and fill with dowel rod sand. Go over with a fiberglass mat and resin. Yes No. Not Helpful 4 Helpful 6. Probably not enough hardener, or the hardener was mixed in unevenly and you had some obe of the resin mix that has no hardener in it.
You might have to grind it bost and start again or get it out using solvent. Another reason might be temperature. Not Helpful 1 Helpful 4. Cut out the inside wall, remove wood, clean out debris, cut new wood to size, install fiberglass one off fiberglass boat construction note, and resin several coats.
Not Helpful 13 Helpful 7. I have bought a ready-made wooden boat. Is it advisable to constructoon glass the bottom of the boat? Or coonstruction I just leave it as it is? No, do not do that, as moisture will get trapped and it will end up rotting. Instead, use a good marine paint, such as international yacht high gloss.
Yes, it requires more effort but the boat will last longer. Not Helpful 0 Helpful 1. Include your email address to get a message when this question is answered. By using this service, some information may be shared with YouTube. Work in a shaded, dry area, preferably with a temperature between 70 F and 85 F 21 C and 29 C. Helpful 5 Not Helpful 5. Related wikiHows How to. How to. Co-authors: Updated: July 18, One off fiberglass boat construction note Boat Building.
Italiano: Applicare la Vetroresina alla Barca. Thanks to all authors for creating a page that has been readtimes. Did one off fiberglass boat construction note article help you? Cookies make wikiHow better. By continuing to use our site, you agree to our cookie policy. About This Article Co-authors: Related Articles How to. By signing up you are agreeing to receive emails according to our privacy policy.
Follow Us. X One off fiberglass boat construction note will you start learning today? Let's do this!
Simply said:tips upon how to Constructing The Fiberglads Doctrine Plan Pt vessel skeleton for indication vessel constructing, a Pflueger Trion GX-7 is between a most excellent saltwater fishing reels.
Hi Matt, that would come one off fiberglass boat construction note the floating wharf as well as additional parking. In a eventuality we demeanour closely it's probable you'll notice which a underside ends of a hire frames have the large lope in them creation a bottom feet or so most larger than a rest of a support. So, dinghies motorboats Selfmade steep vessel as well as mud engine - youtube, a frugal French peasants saved a fiberglasz which performed difficult (and to illustrate was "misplaced" or "perdu") as well as upon a week ends they malleable it with eggs as well as resurrected"lost bread" in to something competent to not.
We have designs which are especially adapted to these methods and have detailed them accordingly. We do NOT recommend taking our other designs with the intention of using one of these methods unless they are specifically intended for fiberglass construction. Our plans detail clearly the best method for building each particular boat. I am part of a southern gospel quartet here in Ft. I am inspired by your love for our Lord and also your love for boat building as I grew up building boats for my family Merritt Sportfishing yachts here in Florida.
Hope we might talk one day. Do you have any diagrams of your models? Thank you to responding so quickly. Your email address will not be published.
Notify me of new posts by email. This site uses Akismet to reduce spam. Learn how your comment data is processed. Boatbuilding with One-Off Fiberglass. Reviews Boats Engines and Parts. How-to Maintenance Buying and Selling Seamanship. Back Services.
Boats PWCs. Boats for Sale View All. Or select country. Search Advanced Search. Personal Watercraft for Sale View All. Liked it? Share it! Facebook Twitter. With over two decades of experience in marine journalism, Lenny Rudow has contributed to publications including YachtWorld, boats. Boat Reviews. Basic Navigation Steve Colgate.
If, after explaining myself, a customer insists, and I don't believe it's use will compromise the overall integrity of the boat, I will let him throw his money away. When you purchase fiberglass fabric of any kind, you will need to know how to ask for what you want.
Because nothing in the boating world is allowed to be either straight forward or simple, the rulers of the fiberglass kingdom have decreed that cloth and roving should be identified by their respective weights in square yards, and that fiberglass mat should be identified by its weight in square feet. This is the dumbest rule ever and leads to near total confusion for the uninitiated.
This is like going to a lumber yard and having the guy behind the counter tell you that teak is sold in board feet, but mahogany is only sold in meters. So when you go to your fiberglass supplier for the first time don't accuse the guy of trying to pull a fast one on you when your 1. By the way, those weights are just about the industry standards for boat work. You will often have a choice of heavier or lighter fabrics, but for general use those are the numbers you would use.
If you do require heavier or lighter fabric, just remember that they must all be heavier or lighter equally. In other words, wafer-thin mat 0. You have to remember how fiberglass fabric is weighed in order to get a good resin to glass ratio. This means that if you are laying up one square yard of 3. If you have to wet out half a square yard of 24 oz roving, you'll need 12 oz of resin. Mat is a little bit different.
You have to use twice as much resin with mat. That means, if you have to wet out a square yard of 1. For a 2 to 1 ratio, you would then need 27 oz of resin to do the trick. When mixed with strands of glass, this becomes a durable construction material that, by weight, is stronger than steel.
Early fiberglass boats were constructed almost exclusively of polyester resin and glass, and most production line boats are still made that way today. Polyester is the most widely used and available resin on the market today. It is also the cheapest, and, not surprisingly, it is also the weakest, the most porous, and shrinks more than any other resin. I don't mean to give the impression that polyester resin is so far below the alternatives that it shouldn't be used.
If that were the case then this book wouldn't exist. I think it's a testament to the qualities of polyester resin that, fifty years later, the fiberglass portions of the boats we choose to restore are still the strongest element left. The following excerpt was taken from Wikipedia. If you understand it, please call me and explain it to me using simple words. Typical polyols used are glycols such as ethylene glycol; acids used are phthalic acid and maleic acid.
Water, a by-product of esterification reactions, is continuously removed, driving the reaction to completion. The use of unsaturated polyesters and additives such as styrene lowers the viscosity of the resin.
The initially liquid resin is converted to a solid by cross linking chains. This is done by creating free radicals at unsaturated bonds, which propagate in a chain reaction to other unsaturated bonds in adjacent molecules, linking them in the process. The initial free radicals are induced by adding a compound that easily decomposes into free radicals.
This compound is usually and incorrectly known as the catalyst. Substances used are generally organic peroxides such as benzoyl peroxide.
I'm not going to lie to you. I don't know what that means. I've tried to understand it, but the more I try, the more I want to slam my head into a wall until I'm unconscious. This is Fiberglass Boat Construction Pdf 01 one of those things where I don't know what I don't know, and I don't care.
This is what I do know. Not all polyester resins are equal. The stuff you buy at the auto parts store is not the same stuff that's intended for use on boats, you will find this to be a recurring theme in this book.
There are two different kinds of polyester resin: Orthophthalic and Isophthalic. If you want to have some fun, go into an auto parts store and ask the guy behind the counter if his polyester resin is orthophthalic or isophthalic.
It's up to you to know the difference. Isophthalic resin was used on most boats prior to the 70s. In the 70s and 80s, really the Diy Fiberglass Boat Construction Engine finest time in American History for giving us all forms of polyester, pet rocks, and disco , the move was made to orthophthalic resin. Not because it was better, but because it was cheaper and easier to use. Ten years later, repairing the blisters caused by the inferior resin became a cottage industry.
It turned out that isophthalic resin was much more solvent resistant. Water, it seems, is an excellent solvent. The water would degrade the resin and penetrate, first the gelcoat, then the layers of glass behind it, resulting in osmotic blisters, colloquially known as boat pox.
Once it was discovered that inferior resin was the culprit, most of the industry shifted back to isophthalic resin. Some went in other directions Today, polyester resin is commonplace. It can be found at local hardware stores, big box stores, marine chandleries, and auto parts stores. It is the basis for most marine and automotive fillers and fairing compounds, and it's easily used.
The advantages of polyesters over other types of resins are that it's easy to find and, because it is cheaper than it's counterparts, it lends itself to the home user as a product that won't break the bank if you screw it up. It also has an advantage over epoxy in that it's cure time can be sped up or slowed down by adjusting the amount of catalyst used. Epoxy is widely viewed as the more talented younger brother to polyester resin. It is stronger and more water resistant.
It is chemically compatible for repairs to polyester based construction and, when mixed with any of a wide variety of fillers, it makes an excellent adhesive, filler, or fairing compound.
It is also compatible with many other substrates used in the marine industry such as steel, aluminum, and wood. At about the same time as the polyester resin revolution was just gathering steam, epoxies were also quietly building momentum.
In , a Russian organic chemist named Nikolia Prileschajev Prilezhaev discovered a method for epoxidation. Epoxidation is, simply put, the joining of an oxygen atom to two other atoms that are already joined. The now obvious implication of this process was that a viscous resin could could be molecularly altered to turn into a hardened solid.
While epoxidation occurs in nature, the ability to replicate the Prileschajev Reaction, as it came to be known, in a lab would not be done successfully for decades. In , Dr. Pierre Castan of Switzerland and Dr. Greenlee of the United States, almost simultaneously, and who share equal credit for the discovery , were able to successfully synthesize epoxidation. Castan's research was done for the Swiss company, Ciba, Ltd.
In the years that followed, epoxy gained notoriety as an excellent adhesive that was capable of bonding to wood, steel, aluminum, fiberglass, and many other materials. It had gained a niche market in the boating world as a superior adhesive for wooden boat construction.
But it hadn't gained wide acceptance as a laminating resin because of expense and it's limitations as a coating. By all accounts, the Gougeon brothers, Jan and Meade, revolutionized the world of epoxy by starting West Systems.
Although the company wasn't founded until the s, The Gougeon brothers had been working and experimenting with epoxies since the late s. It was their work that brought a workable, easily used epoxy to the mainstream of boat construction and repair. Today, the epoxy industry has evolved into a competitive world that is increasingly user friendly, price-conscious, and adaptable. Epoxies are now customized for specific purposes, from laminating fiberglass to below-the-waterline barrier coatings to finished surfaces.
While epoxy is a windfall for the marine industry, it is not without its drawbacks. The two most glaringly obvious are: Its price, it is still the most expensive of the choices available for resins, and its limitations for use with other resins.
Specifically, epoxy will adhere like a dug-in tick to all other cured resins, but other resins don't adhere well to cured epoxy. Other drawbacks include shrinkage � while polyester shrinks the most in the curing process, epoxy is not far behind � and cure times. Polyester resin cure times can be accelerated or retarded depending on the amount of catalyst added, but epoxies require exact mixing ratios of resin to hardener.
To alter the cure time of epoxy, it's necessary to buy a faster or slower hardener. Finally, epoxies, like a professional athlete with a nagging hamstring injury, are handicapped by amine blush; an annoying byproduct of all epoxies, but it's most noticeable in cheaper epoxies and with some slower hardeners.
Amine blush is a waxy hazy film that develops when curing epoxy is exposed to moisture or humidity. In extreme cases, it can cause the the surface to become a milky white and chalky, but even if you don't see it, it's there. This means that cured epoxy must be cleaned either with soap and water or, in extreme cases, by sanding and solvent wiping, before the epoxy can be coated, either with a finish or with more fiberglass.
I'm going to start this with a baseball analogy for two reasons; first, I like baseball and it pleases me, second, I've found that baseball works as an analogy for everything. Polyester is the utility infielder of the boat building world; good at most things, but not great at any, but still able to be had for a decent price.
Epoxy, on the other hand, is the Ichiro or Ken Griffey Jr. New York and Boston can bite me. In other words, epoxy is the star; expensive and worth it. It puts up the big numbers, it leads the league in hits and home runs. Vinylester is the finesse player. Vinylester is the Greg Maddux of resins. Unimposing to look at, yet, day after day, year after year, it quietly wins every game until, at the end of it's career, you look back and realize it's going into the Hall of Fame.
Undervalued, under reported, and underestimated, vinylester is the inexpensive best of both worlds. The name implies that it is closely related to polyester resin. For the purposes of the amateur boat restorer, it is. It is catalyzed the same as polyester, it's chemically compatible with polyester, and the cure time can be adjusted like polyester. It has all of the good points of polyester, but few of the drawbacks.
It is more waterproof, It shrinks less than both polyester and epoxy, and it is relatively inexpensive. Technically, it is a hybrid of polyester and epoxy. I'm hesitant to say that because, even though it's true, it might give the reader the mistaken impression that it is equally compatible with both.
It's not. Like polyester, epoxy will adhere very well to it, but it doesn't adhere very well to epoxy. As far as I'm concerned, this drawback is grossly outweighed by its advantages. Vinylester resin finds its roots in the aftermath of the osmotic blistering age.
The boat building world was looking for both the cause and the solution to the problem. Vinylester resin was experimented with as a barrier coat between the porous gelcoat and first layers of fiberglass behind it, and it did so with great success. Because it is still, and always was, moderately more expensive than polyester resins, it's use as the primary resin for fiberglass lamination didn't catch on with the mass-production builders.
These days, vinylester built boats are considered to be a mark of high quality, and rightfully so. With a price that is far below most epoxies, I believe this is the best resin available for at-home boat restoration. Ultimately, the resin you choose to use is going to be based on your comfort level, your pocketbook, availability, and whimsy.
Fiberglass Fabrication. I wasn't sure whether or not to add this section to the book because fiberglass fabrication as opposed to repair is generally not associated with boat restoration, but after serious thought, I decided its omission would close the doors to an entire subset of creativity.
Before I start talking about how to build something new, I want to clarify what I meant by that last paragraph. It's certainly important to know how to fabricate new pieces for an incomplete boat. It's also important to know how replace pieces that are so badly damaged that repair is not an option.
Those two situations alone are reason enough to add this section. But there is another reason. A reason that goes largely untalked about. A reason that is looked upon with disdain by many and as sacrilege by some. That reason is customization. There are some boats that are considered untouchable. The Glass Slipper, the Lonestar Meteor, the Bell Boy Banshee, the Herter's Flying Fish, and many others in the eyes of their followers; these are boats that would inspire anger bordering on violence if we were to come across one that had been defiled by an amateur who decided to completely alter the original intent of the designer.
Then there are the others. I'm not going to name names Moldless Fiberglass Boat Construction Jack because to mention a specific boat would inevitably piss someone off, but we've all seen them.
A fifty year old derelict sitting in someone's back yard, for sale for a hundred bucks. These boats don't have the cult-like following. They may not have the tail fins or the unique hardware or the headlights or the These boats are cheap and neglected because they weren't blessed with a creative designer.
But does that mean these boats should be relegated to the scrap heap? Does that mean these boats aren't worthy of restoration? Absolutely not. The customization of classic cars using whatever materials are laying around the shop have come to be known as Rat Rods.
Sometimes the customization is necessary because the vehicle is too far gone to repair. Sometimes it's because the artist, and I do consider them art , doesn't have the money to restore them properly. And sometimes it's because it's just fun to see what you can make from nothing.
Regardless of the reason, whether by necessity or by creativity, without them, the world is a duller place. Without the artistic eye of a man on a budget, our roads would be limited to a sea of indistinguishable sedans and SUVs.
Love them or hate them, we always notice them. But for some reason, that creativity has gone largely ignored by its marine counterparts. I, for one, would love to see more customized, one of a kind entries into the classic boat world.
In fact, I find it ironic that the things we love most about Glassic boats; their originality, their wild divergence from the accepted norms of nautical history, is so closely bound by an unwillingness to take design risks in their restoration.
If we, as a group, don't move beyond the hoarding mentality, then we've betrayed their spirits, they might as well be animals in a zoo. To be clear, I have a Bell Boy Banshee. I love it. I think it's perfect. I wouldn't change a thing about it.
But everyday, I see disregarded featureless boat offered virtually for free. I never pass by one without thinking, I could make that boat sing. I could make that thing the wildest boat anyone has ever seen. I could make that boat look like a cartoon, and the only detriment to the world would be one less boat in a landfill. So, while this section is necessary for some who need to learn how to restore their boat to its original condition, it is my sincere hope that some who read this will be inspired to take a risk and create their own masterpiece.
Making Plugs and Molds. It is not always necessary to make a plug or a mold when fabricating new construction.
Typically, they are used for production runs of more than one piece. However, building a plug or mold is both an educational experience and a gratifying accomplishment. While this was quickly covered in the introduction, I'll go into more depth here and try to help the reader from making some of the more common mistakes.
It may be pedestrian, but it's important to note the difference between a plug and a mold. Both are simply a negative shape, the inverse of the piece you want to make. A plug is used to lay up fiberglass on the outside of the shape and a mold is used to lay up fiberglass on the inside of the shape.
It can be structurally solid, as when used for long production runs, or it can be built for a single use. It is up to the reader to decide for himself how sturdy or how flimsy a mold needs to be. First, a plug or mold doesn't need to be built like they do in the factories. It can be cardboard, it can be Tupperware, it can be a bowling ball, it can be plywood, a tee-shirt, your wife's fine china, your kid's iPod, a solid block of wood, or made from an existing piece that you want to duplicate.
It can be made out of whatever is available that will create the shape you choose. For the purposes of this section, I'm going to pretend that we're making both a plug and a mold for a battery box. It's a simple shape and easily described. But now matter how complex your mold or plug may be, the process doesn't change. Whether you're making flat panel or a fiberglass representation of the Chrysler Building, the steps remain the same.
For our battery box, obviously we need to know how big to make it. This isn't quite as simple as measuring the battery and building a box that will accommodate it. We have to take into account the thickness of the final product. If our finished battery box is going to be made out of a quarter inch thick fiberglass then we have to alter the dimensions of our plug or mold to take that into account.
If we are making a plug, then we have to build it to the inside dimensions of the finished box because the box will be built from the inside out. If we're making a mold, we have to build it to outside dimensions because it will be built from the outside in. Since deep-cycle marine batteries are very difficult to make smaller, you probably want to get this right the first time. Once you have your dimensions, it's time to start building the box shape.
This can be made out of any material you want, from plastic to plywood, but it's important to know, if your goal is a smooth finish, using a smooth material will make the process much easier. For this reason, a finished surface material such as hardiboard or masonite will speed things up. If you use plywood, try to use a finish grade or sand the surface smooth prior to construction of the box.
Since plywood is common and cheap, I'm going to continue this section under the assumption that it is the medium of choice. The box doesn't need to be built like furniture. It doesn't need to be of dovetail construction or have interlocking miters. Remember, you building a shape. It should, however, be strong enough to withstand working on it without deforming or collapsing.
Gluing and screwing it together will be more than strong enough. If you're making a mold, it doesn't matter how thick the plywood is so long as it's rigid. If you're making a plug, you will need plywood that's at least half an inch thick.
I'll explain why in just a second. Once the box is built, you need to fillet the corners of the mold. Filleting means rounding over the inside corners. As mentioned earlier, some wetted out fiberglass fabrics don't conform to tight corners well. Mat will conform to complex shapes most easily, woven roving will conform with the most difficulty, and fiberglass cloth is somewhere in between. When you're laminating multiple layers of fiberglass, you'll be using mat and at least one of the other two fabrics.
If you try to build up layers of fiberglass against a sharp 90 degree angle, the mat will do OK, but the subsequent layers of cloth or roving will either pull away from inside corners or lift away from outside corners. The result is delamination at every corner. That's why it's important fillet all of the inside corners and round over all of the outside corners. There are a number of products that can be used for filleting.
You can use Bondo or another fairing compound. You can use a polyurethane sealant such as 3M or you can sculpt it out of wood. My recommendation is Bondo. It cures quickly and it can be sanded to give a nice finished shape. In the end, it doesn't matter what you use so long as you get the shape right and it stays put. If you're making a plug, you'll need to round over each outside corner.
This is why you need plywood that's at least half an inch thick. If the plywood is too thin, you won't be able to round over the corners enough. Whether filleting or rounding over, the larger the radius, the better in terms of fiberglass lamination. If you're not making a battery box, but instead making a more complex shape, you will probably have both inside and outside corners to deal with.
With the mold or plug now built, It's time to fair the mating side. Your finished product will only be as smooth as your form. If you want a glass smooth finish as soon as it's popped out of the mold, then your mold must be glass smooth. This is where experience is going to come into play. When boats are built, great care is taken to ensure the mold or plug is absolutely perfect. This is because dozens, if not hundreds and sometimes thousands of boats will be made from it.
If you are building a mold or a plug in your garage for a single use, you have to ask yourself which is easier, perfecting the mold or plug , or perfecting the product once it's out of the mold. The answer is not the same for every situation. Here are my personal thoughts. In order to get a beautiful glossy gelcoat finish on any one-off molded piece of fiberglass, a great deal of sanding, compounding, and polishing is going to occur at some point in the process.
Whether you spray or brush gelcoat on the inside of a mold, the outside of a plug, or directly onto the fiberglass that been popped out of the mold, there is no escaping this procedure. The only variable is what is easiest. In terms of our battery box, we have to imagine our finished product.
Where is the battery box going to live? What part of it will be visible? This is what defines if you make a mold or a plug and which side is the glossy side. If the battery box is going to live on the floor in the boat back by the transom for all the world to see, then naturally you'd want the outside of the box to be the finished side.
But maybe you want to cut out a square in the floor and drop your new battery box inside of that hole, in that case, the inside of the box would be the part you see. So how does this information help us make our decision? Well, it's a helluva lot easier to sand the outside of something than it is to sand the inside of something. Take a cardboard box and a sanding block and see how much mobility you have when you mimic the sanding motion on the inside of the bottom of the box.
Now flip the box over and mimic the sanding motion on the outside of the bottom of the box. I think you'll agree that sanding the outside is a lot more effective. If our box is going to be shiny on the outside, it will be easiest to build a mold and add gelcoat to the finished product after it's been removed. If we want the inside to be shiny, it will be easiest to build a plug, spray the plug with gelcoat and polish it up, then, when the polished plug has been duly waxed, spray on more gelcoat and laminate our fiberglass on top of that.
When we separate the two, we will have a mirror image of the polished plug. As you can see, neither situation requires sanding and polishing the inside of the box beyond the filleting stage. Side note: There are two factors which are vital to the success of your project. First, if you intend to add the gelcoat after the mold, it is vital that you seal the mold prior to fiberglass lamination.
If Fiberglass Boat Construction Methods Design your mold has any porosity whatsoever, the resin used in the layup will fill those pores and make separation of the mold impossible. Sealing the mold with several coats or more of spray lacquer is essential.
|
Ncert Solutions Class 10th Maths Chapter 5 Result Small Boats Pinterest Workshop |
